This No-bake Orange Creamsicle Cheesecake brings a sunny twist to dessert! It’s creamy, sweet, and packed with a fresh orange flavor that zings.
No need for an oven here, which is perfect for those hot days! I love making this when I want something fun and fruity—it’s like a summer party on a plate! 🍊✨
Key Ingredients & Substitutions
Graham Cracker Crumbs: The base of the crust, graham cracker crumbs provide sweet crunch. If you want a gluten-free option, you can substitute with crushed gluten-free cookies or almond flour mixed with a bit of sugar.
Cream Cheese: This gives the cheesecake its rich creamy texture. For a lighter version, use Neufchâtel cheese. If dairy-free, opt for a vegan cream cheese alternative.
Heavy Whipping Cream: It adds airiness to your filling. You can use canned coconut cream for a dairy-free option or even whipped topping for convenience.
Orange Juice and Zest: Fresh juice and zest provide vibrant flavor. If you’re out of fresh oranges, use store-bought juice but look for 100% juice without added sugars. Bottled lemon juice works too in a pinch for a different zing!
Gelatin: This is optional for added stability. If you prefer a vegetarian option, agar-agar can work as a substitute but check the package for usage instructions as it functions differently.
How Do I Get the Cheesecake Filling Just Right?
Getting a smooth, creamy filling is crucial for this cheesecake. Here are some tips to help achieve this:
- Ensure your cream cheese is softened to room temperature for easy mixing.
- Beat the cream cheese and powdered sugar together thoroughly to remove any lumps before adding other ingredients.
- Add the orange juice slowly while mixing to maintain a smooth texture.
- Fold the whipped cream gently into the mixture to keep that airy feel—don’t stir too hard!
No-bake Orange Creamsicle Cheesecake
Ingredients You’ll Need:
For the Crust:
- 1 ½ cups graham cracker crumbs
- ½ cup unsalted butter, melted
- ¼ cup sugar
For the Cheesecake Filling:
- 16 oz cream cheese, softened
- 1 cup powdered sugar
- 1 cup heavy whipping cream
- 1 cup orange juice
- Zest of 1 orange
- 1 tsp vanilla extract
- 2 tsp gelatin (optional, for stability)
- 2 tbsp cold water (for gelatin)
For the Orange Swirls:
- ½ cup orange puree (made from fresh or canned oranges)
- Additional orange slices for garnish
- Whipped cream for topping
How Much Time Will You Need?
This delightful cheesecake will take about 20 minutes for preparation and about 4 hours to chill in the refrigerator. For the best texture, it’s ideal to let it sit overnight. Perfect for a make-ahead dessert!
Step-by-Step Instructions:
1. Preparing the Crust:
In a mixing bowl, combine the graham cracker crumbs, melted butter, and sugar until everything is mixed nicely. Press this mixture firmly into the bottom of a 9-inch springform pan, making sure it’s even. Once done, pop it in the refrigerator to chill while you prepare the filling.
2. Blooming the Gelatin (if using):
If you’re using gelatin for extra stability, take a small bowl and sprinkle the gelatin over the cold water. Let it sit for about 5 minutes until it gets soft. Then, gently heat it until it’s completely dissolved (but don’t let it boil!).
3. Making the Cheesecake Filling:
In a large bowl, use a mixer to beat the softened cream cheese and powdered sugar together until it’s smooth and creamy. Gradually add in the orange juice, orange zest, and vanilla extract, mixing well. If you are using gelatin, stir in the dissolved mixture until everything is well combined.
4. Whipping the Cream:
In a different bowl, whip the heavy cream until stiff peaks form. Be gentle here! Fold the whipped cream into your cream cheese mixture carefully until both mixtures are combined—this keeps it light and airy.
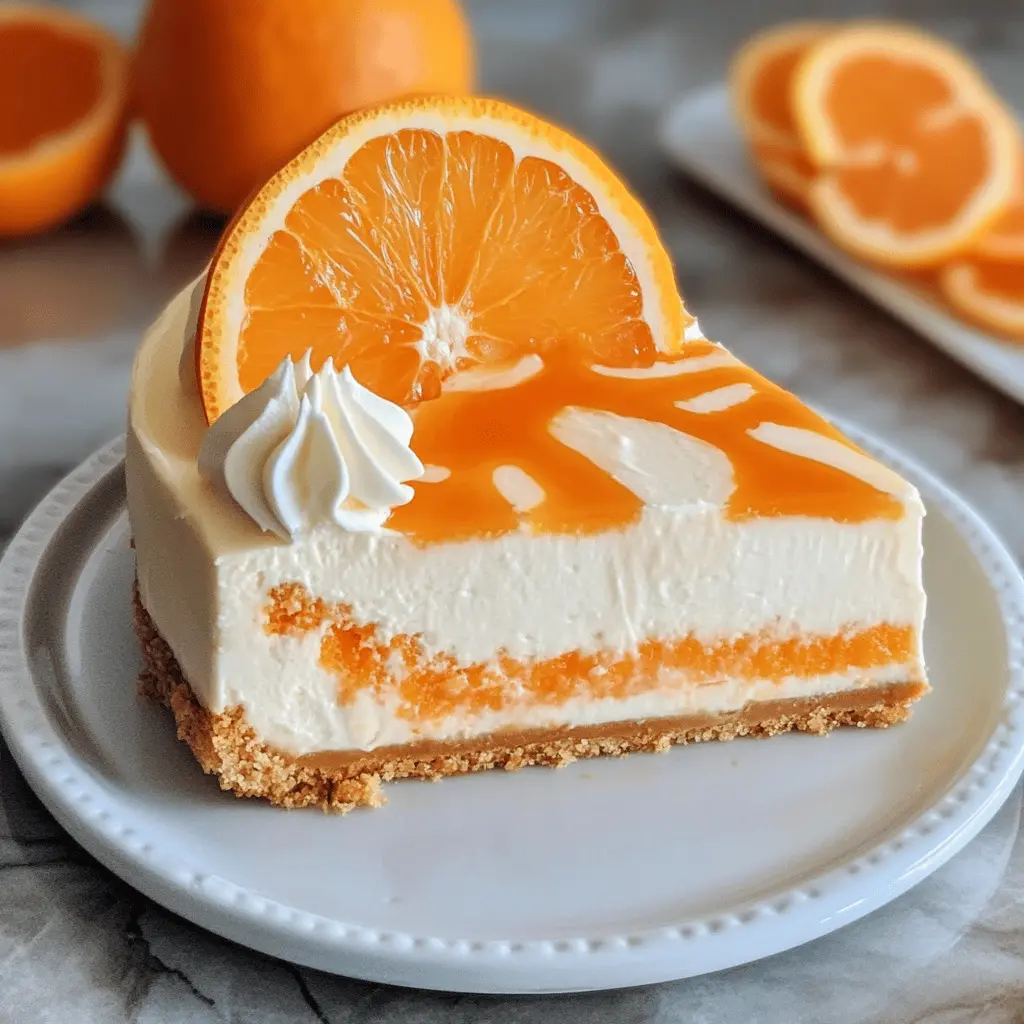
5. Layering It All Together:
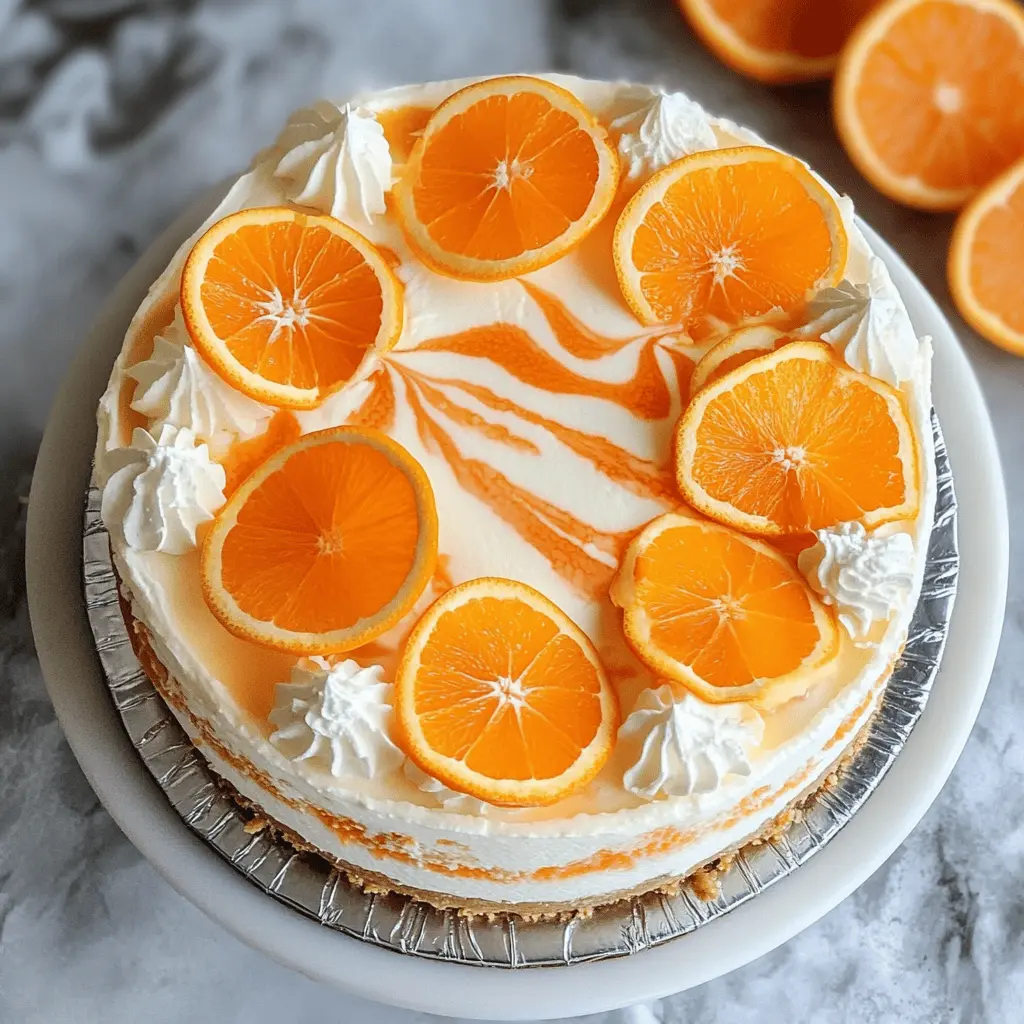
Pour half of the cheesecake mixture into the crust. Take half of the orange puree and spoon it over the top, using a knife to gently swirl it together. Then, pour the rest of the cheesecake mixture over this layer, and finally, add the remaining orange puree on top, swirling it again to create a beautiful marbled effect.
6. Chilling the Cheesecake:
Cover your cheesecake with plastic wrap and place it in the refrigerator. Let it chill for at least 4 hours until it’s set—overnight is best for perfecting the texture.
7. Serving Your Cheesecake:
Once the cheesecake is set, carefully remove it from the springform pan. Before serving, decorate the top with additional orange slices and dollops of whipped cream. Slice, serve, and enjoy every creamy bite of your No-bake Orange Creamsicle Cheesecake!
Can I Use a Different Type of Crust?
Absolutely! If you want to switch things up, you can use cookie crumbs (like Oreos or vanilla wafers) or even a nut-based crust for a gluten-free option. Just make sure to adjust the sugar depending on the sweetness of your crust choice!
What Can I Substitute for Heavy Cream?
If you’re looking for a lighter option, you can use whipped coconut cream or half-and-half. However, your cheesecake may not be as rich and creamy. If using half-and-half, you can add a bit more gelatin for extra stability.
How Do I Store Leftovers?
Store any leftovers in an airtight container in the fridge for up to 5 days. The cheesecake may be slightly softer the next day, but the flavors will have deepened, making it just as delightful!
Can I Use Gelatin-Free Options for Stability?
Yes! If you prefer a gelatin-free option, try using whipped coconut cream to stabilize your filling or incorporate a plant-based thickener like agar-agar instead. Follow the package instructions as a substitute for the gelatin quantity.