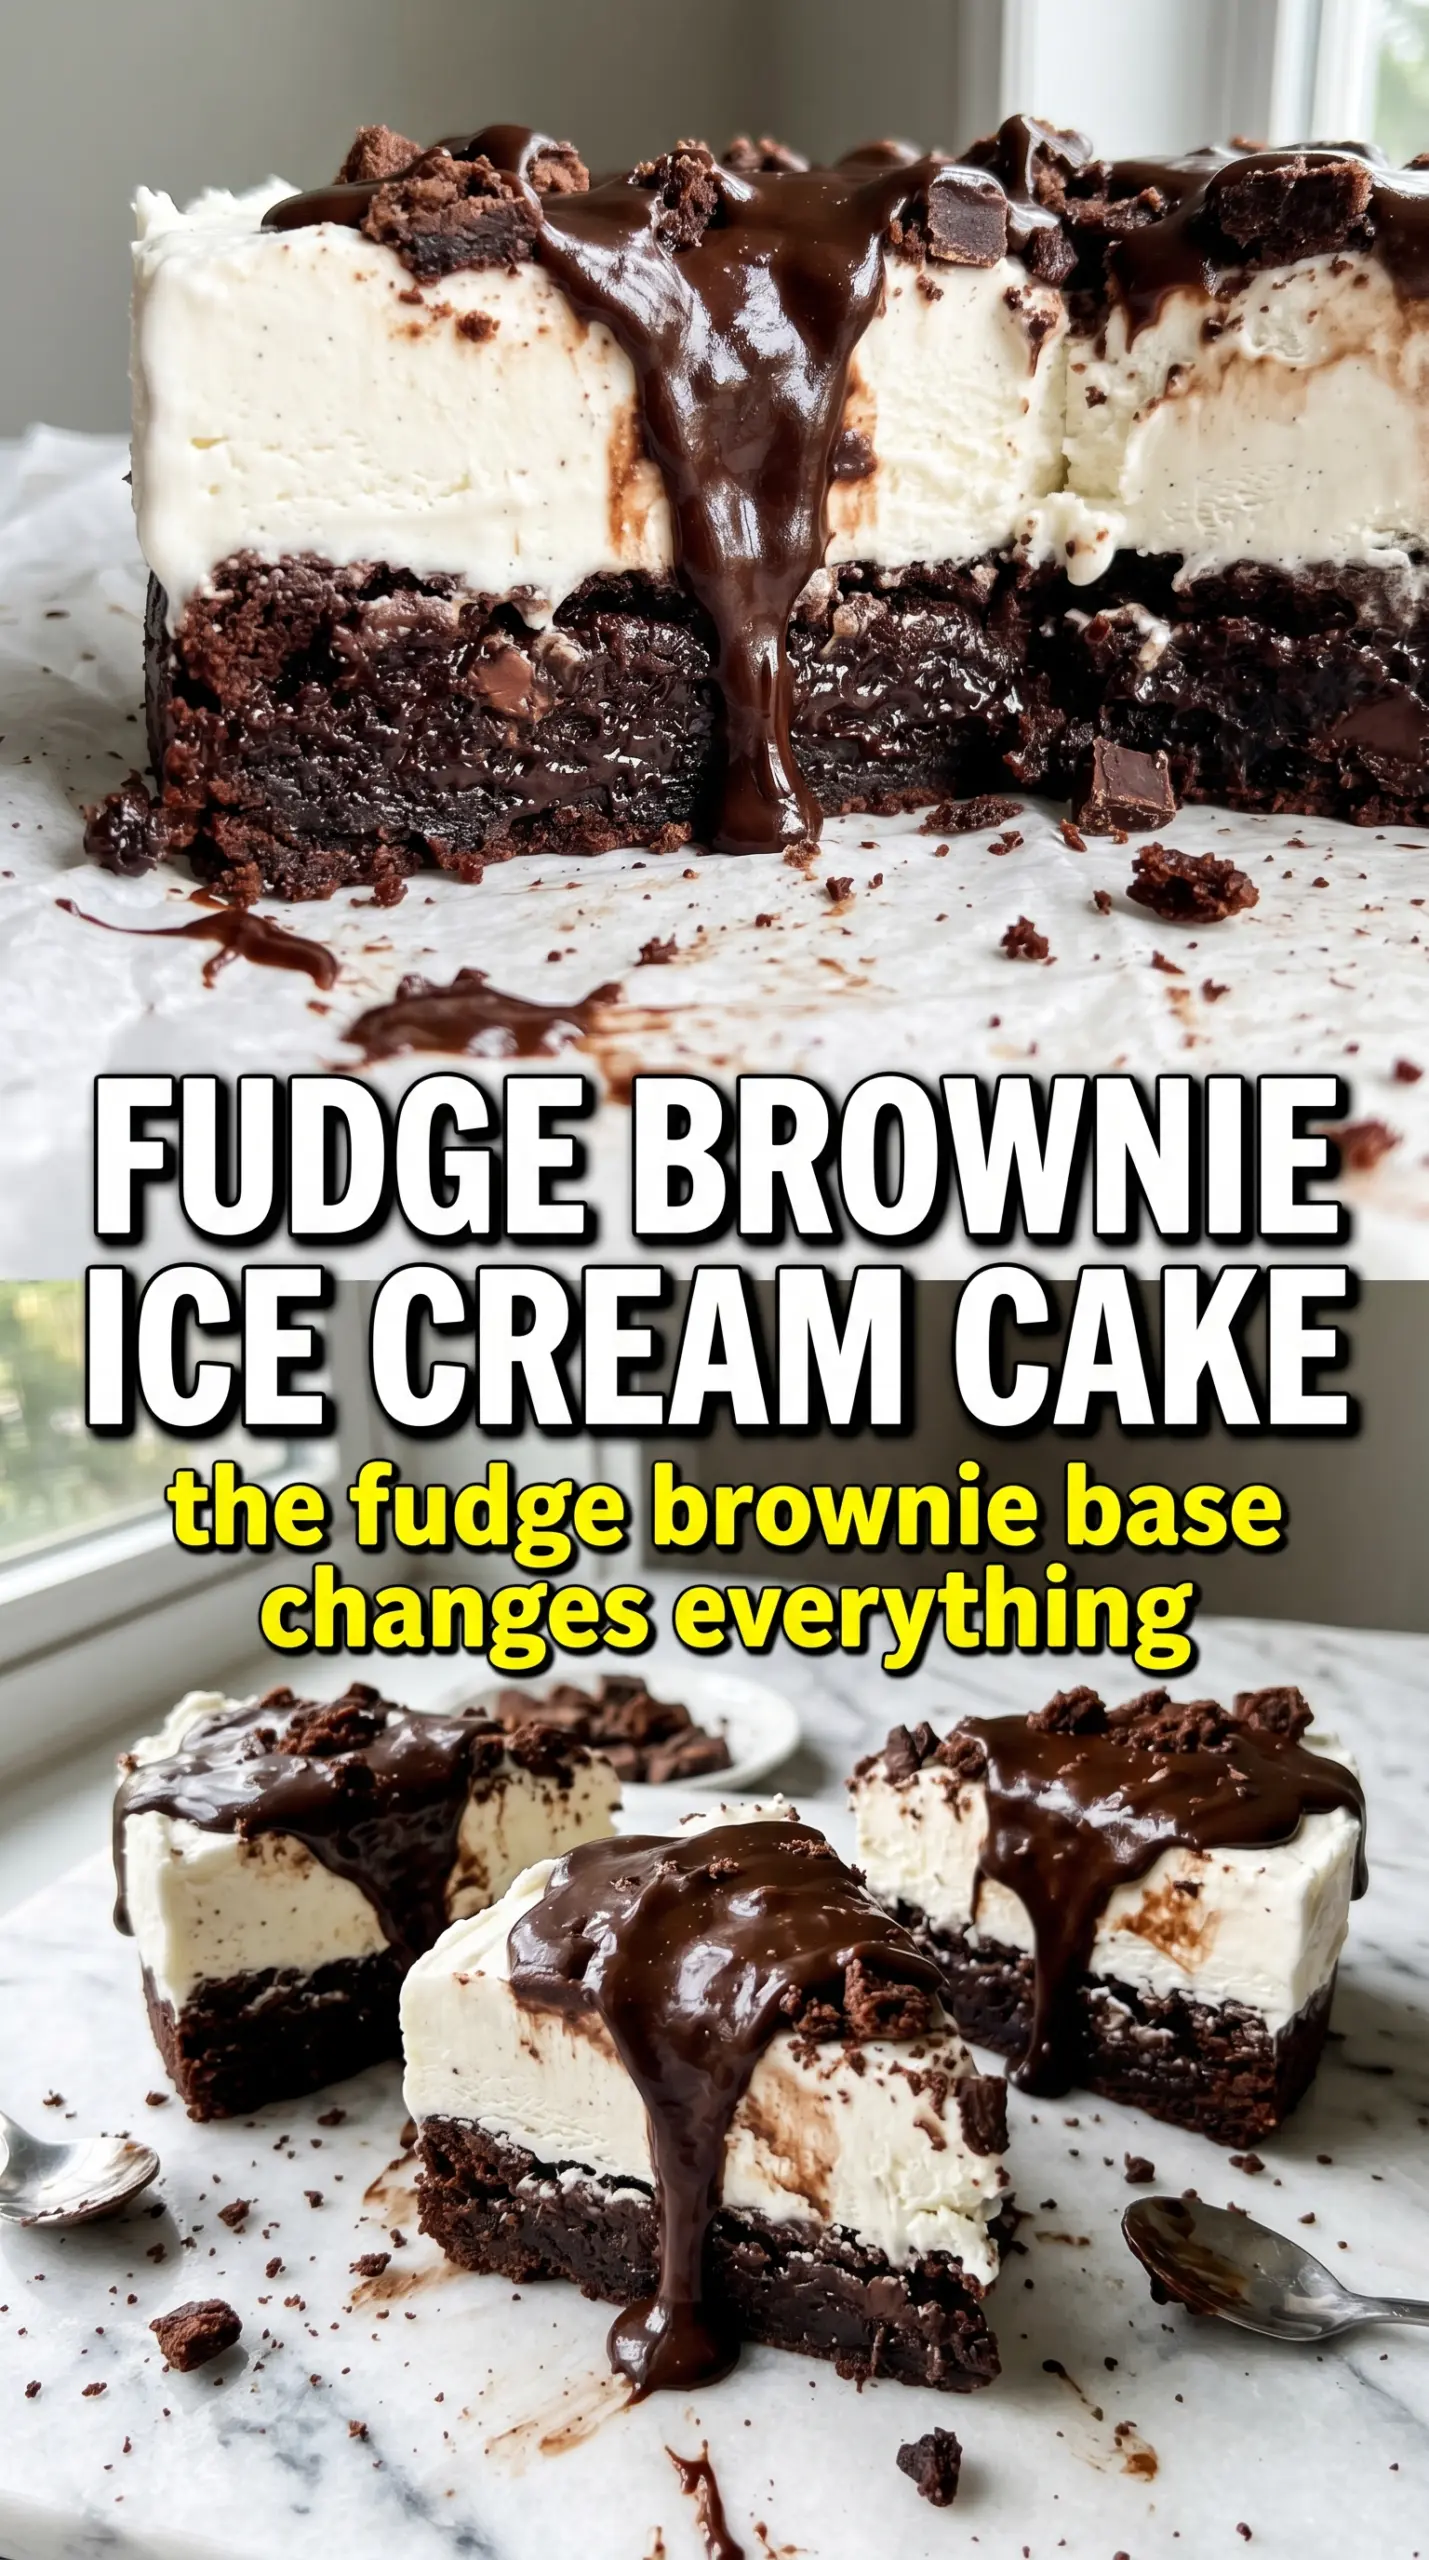
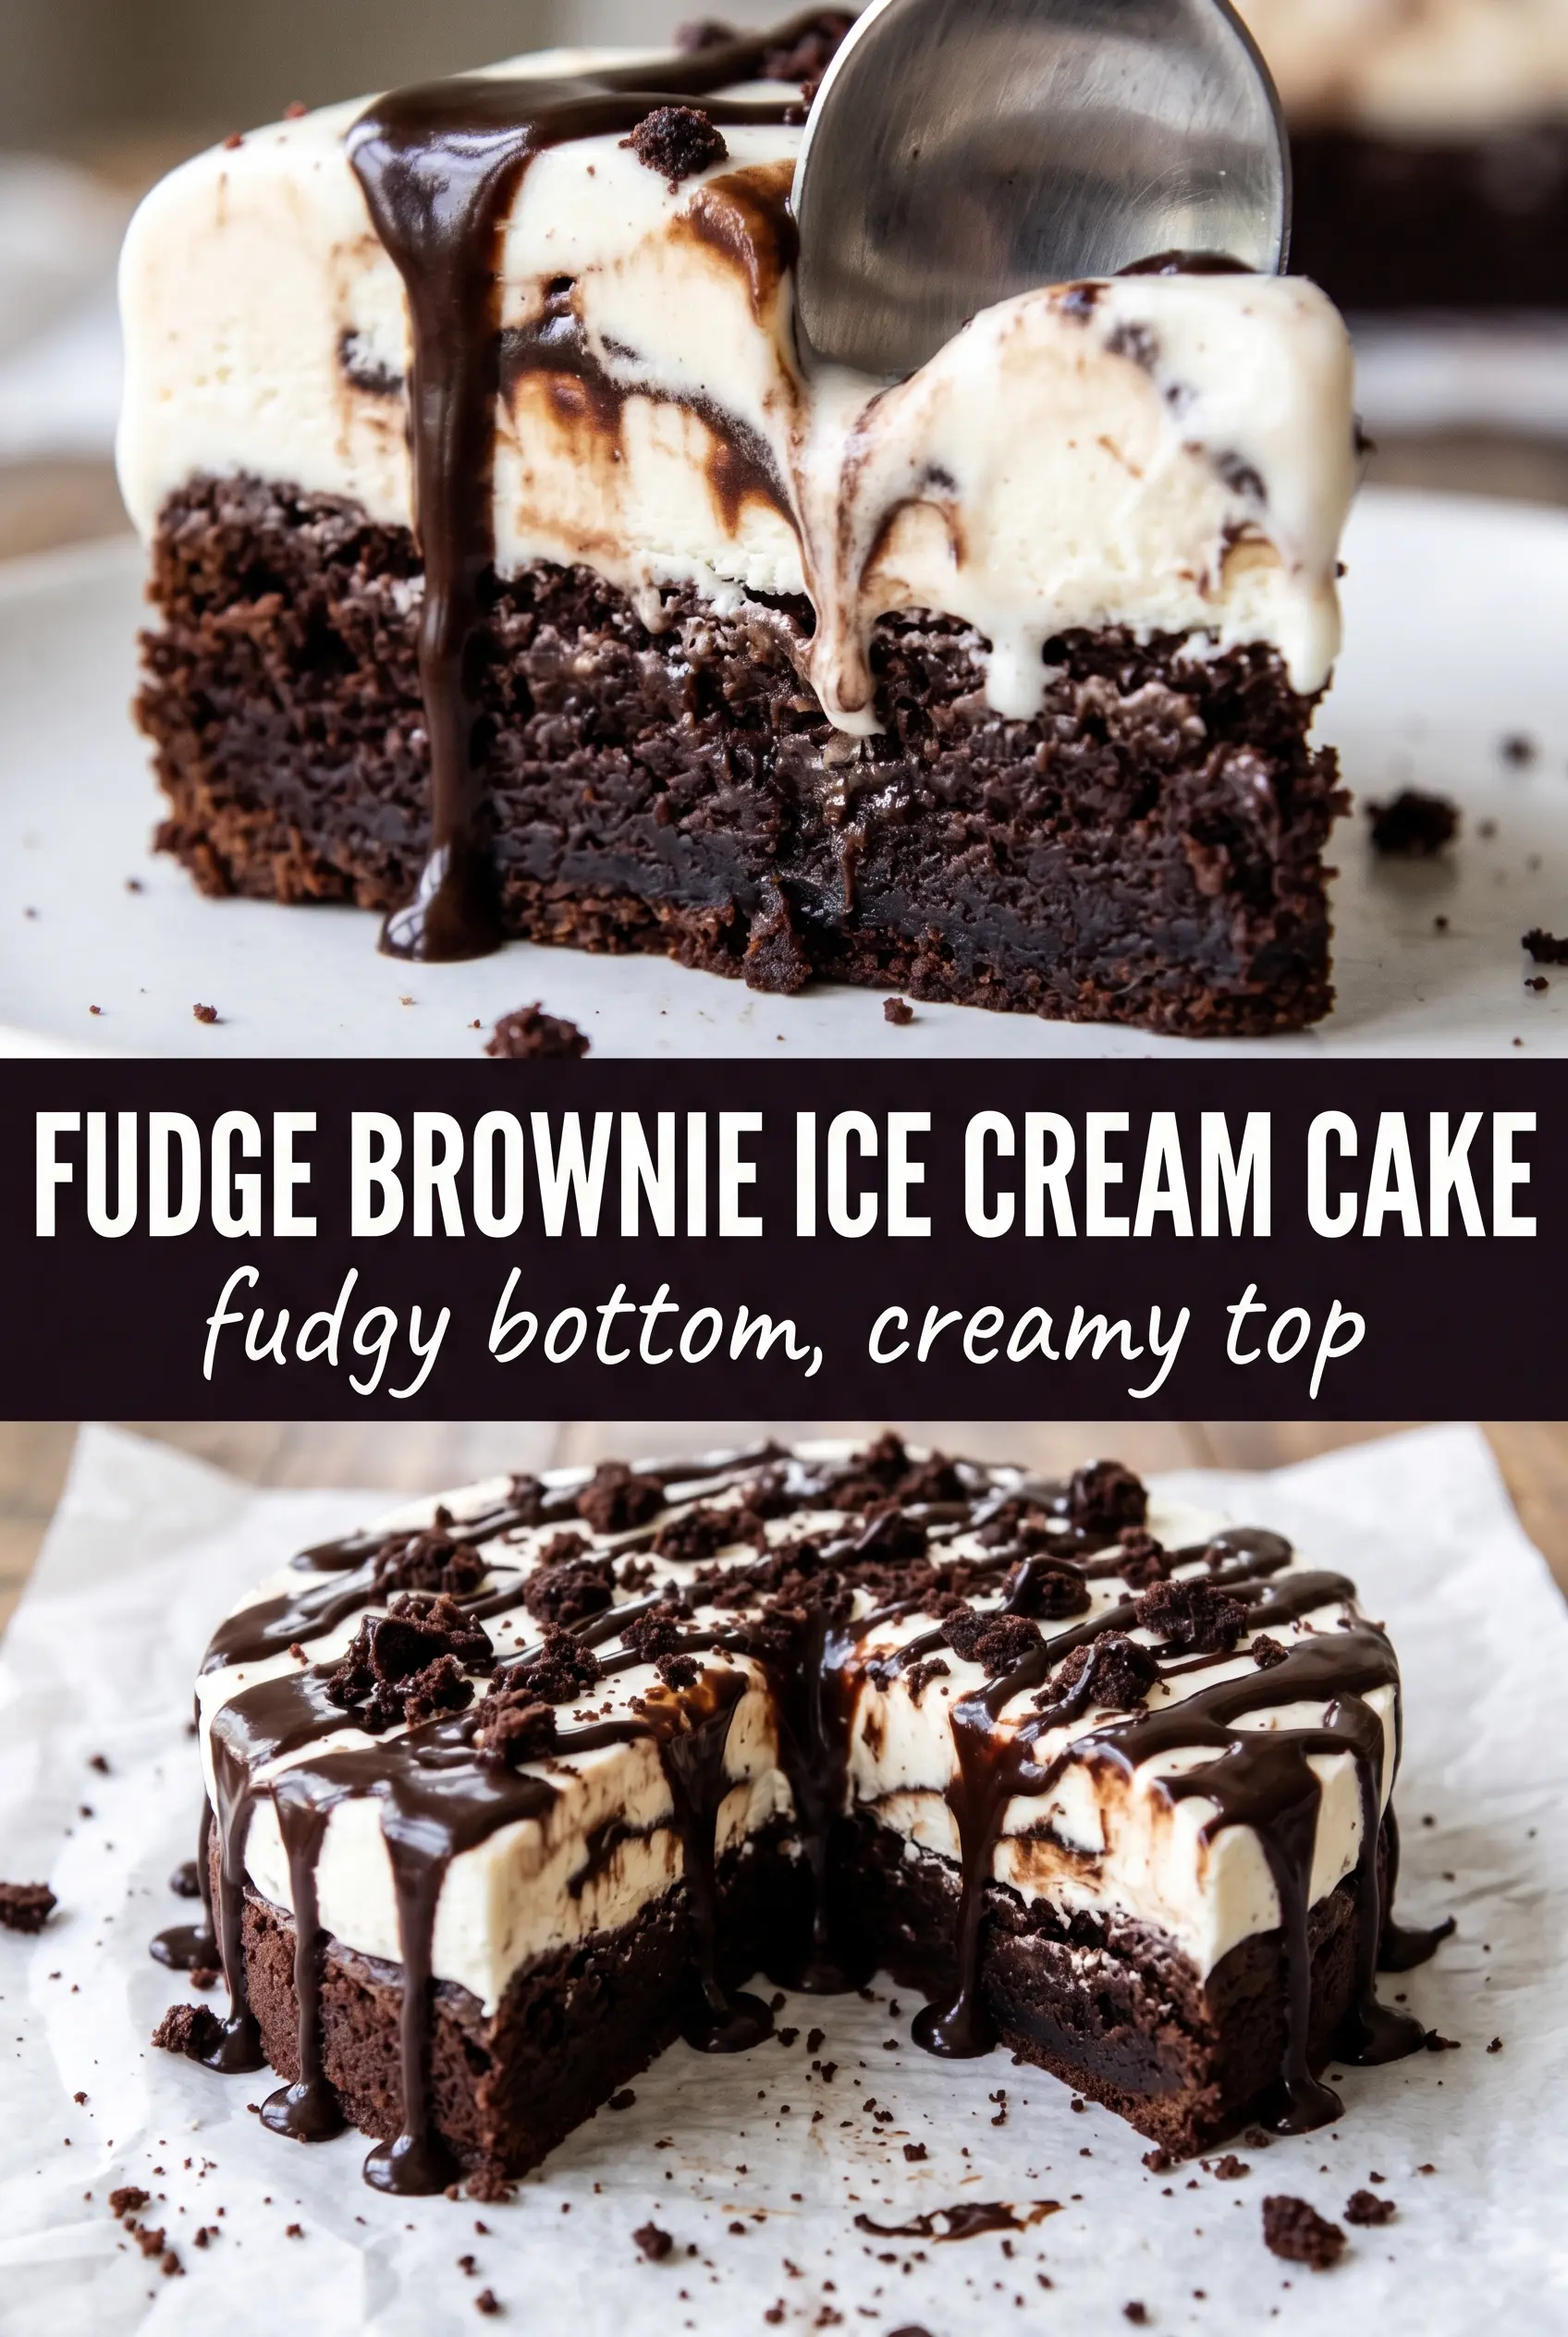
Fudge brownie ice cream cake hits the sweet spot between nostalgic and over-the-top in the best way. The brownie layers stay dense and fudgy even after freezing, while the vanilla ice cream settles into a smooth middle that cuts cleanly instead of turning icy. The hot fudge keeps each bite from tasting flat, so you get cold creaminess, deep chocolate, and that chewy brownie edge all at once.
The trick is in the temperature contrast and the order of the layers. The brownies need to be completely cool before they go into the pan, or they’ll melt the ice cream at the base and leave you with a slumping center. Softened ice cream spreads easily, but it shouldn’t be soupy; you want it pliable enough to press into an even layer without dragging up the fudge underneath.
Below, you’ll find the exact layering method that keeps this cake neat when sliced, plus a few smart swaps if you want to use homemade brownies, change the topping, or make it ahead for a birthday or crowd.
The brownie layers stayed fudgy after freezing and the hot fudge made each slice taste like a real ice cream shop cake. I let it sit 10 minutes before cutting and it came out clean with no icy cracks.
Save this fudge brownie ice cream cake for birthdays when you want thick brownie layers, ribbons of hot fudge, and a clean slice every time.
The Reason This Cake Slices Clean Instead of Collapsing
Most ice cream cakes fail at the same point: the layers never get firm enough before the knife goes in. This one works because the brownie layers act like anchors. They give the cake structure, so even after the ice cream softens slightly at the table, the slice still holds its shape.
The other detail that matters is the hot fudge. Spread too much and it turns messy; spread too little and the cake tastes like brownie with plain ice cream. A thin, even layer between the brownie and ice cream gives you that dense chocolate hit without forcing the ice cream to slide around. Freezing overnight isn’t optional here. The cake needs that time for the center to set all the way through.
What the Brownies, Ice Cream, and Fudge Are Each Doing Here
- Brownie mix or homemade brownies — Either works, but the brownies need to bake up fudgy, not cakey. A boxed mix is fine here because the freezer and the ice cream do most of the work, while homemade brownies give you a deeper chocolate flavor if that’s your thing. Bake them in two round pans so the layers stack neatly without cutting.
- Vanilla ice cream — Use a good-quality vanilla because it’s the soft, creamy middle of the cake and there isn’t much else to hide behind. Let it soften on the counter until it spreads without cracking; if it’s half-frozen, you’ll tear up the fudge layer underneath. Don’t let it melt into soup or the cake will refreeze unevenly.
- Hot fudge sauce — This is the ingredient that makes the cake taste rich instead of just cold and sweet. Store-bought fudge works well as long as it’s thick; if yours is stiff from the jar, warm it just enough to drizzle, then cool it slightly before layering so it doesn’t run off the brownie.
- Whipped cream and chocolate shavings — These are mostly for the finish, but they matter for texture and presentation. The whipped cream softens the first bite, and the shavings add a little snap against all that cold creaminess. Add both right before serving so they stay fresh and don’t weep on the frozen top.
Layering the Cake So the Center Stays Dense and Neat
Start with a Fully Cooled Brownie Base
Set one brownie round into a 9-inch springform pan and press it down gently so it sits flat. If the brownie is even slightly warm, it will start melting the ice cream at the bottom and you’ll lose that clean, stacked look. The pan needs to be springform so the cake releases without tearing the edges apart later.
Spread the Fudge Before the Ice Cream
Drizzle half of the hot fudge over the brownie and spread it into an even layer. The fudge should be thick enough to stay where you put it, but not so stiff that it rips the brownie when you try to move it. If the fudge is too hot, let it cool for a minute or two; heat is what causes the layers to slide.
Pack in the Softened Ice Cream
Spoon the softened vanilla ice cream over the fudge and spread it from edge to edge. Work quickly so it stays scoopable, and use a spatula to press out air pockets as you go. If you leave gaps, the frozen cake can slice into pockets instead of one clean, creamy middle.
Finish the Stack and Freeze Hard
Drizzle the remaining fudge over the ice cream, then place the second brownie layer on top and press it down gently. Freeze the cake for at least 8 hours, though overnight gives you the best texture and the neatest cut. When you’re ready to serve, let it sit at room temperature for 10 minutes so the knife moves through the brownie instead of shattering it.
Use a Chocolate Ice Cream Layer Instead of Vanilla
Swap in chocolate ice cream if you want a deeper, truffle-like dessert. The cake will taste more intense and less sweet, but you’ll lose some contrast between the brownie and the filling. It works best if you keep the hot fudge layer in place so the cake still has that gooey center.
Make It Gluten-Free with a GF Brownie Mix
Use a gluten-free brownie mix or a tested homemade gluten-free brownie recipe and bake it in the same two-round format. The structure still works, but GF brownies can be a little more delicate when frozen, so line the pan with parchment for easier release. The texture stays rich and fudgy if you don’t overbake them.
Turn It into a Dairy-Free Ice Cream Cake
Use dairy-free vanilla ice cream and a dairy-free hot fudge sauce, then keep the same layering method. The cake will still slice well, but the texture may soften a little faster at room temperature, so serve it straight from the freezer with no long delay. A nut-based ice cream works especially well because it tastes rich enough to stand up to the brownie.
Storage and Reheating
- Refrigerator: Don’t store this in the fridge. The ice cream layer will melt and the brownie base will turn soggy.
- Freezer: Wrap the assembled cake tightly and freeze for up to 1 week for the best texture. It can last longer, but the brownie edges may pick up freezer flavor.
- Reheating: There’s no reheating here. Let the cake stand at room temperature for 10 to 15 minutes before slicing so the knife cuts through cleanly instead of cracking the frozen layers.
Answers to the Questions Worth Asking
Fudge Brownie Ice Cream Cake
Ingredients
Equipment
Method
- Bake the brownie mix in two 9-inch round pans according to package directions, then cool completely. Cool until the rounds are room temperature so the ice cream doesn’t melt.
- Place one cooled brownie round in a 9-inch springform pan and drizzle 1/2 cup hot fudge over the surface. Use the back of a spoon to spread it into an even layer.
- Spread a thick, even layer of softened vanilla ice cream over the hot fudge. Press gently so the ice cream fills gaps and creates a flat layer.
- Drizzle the remaining hot fudge over the ice cream layer. Let it sink slightly so you can see hot fudge throughout when sliced.
- Place the second brownie round on top and press gently to level the surface. Make sure the edges align so the cake holds its shape.
- Freeze for at least 8 hours or overnight, until firm all the way through. The cake should cut cleanly with visible layers.
- Top with whipped cream and chocolate shavings before serving. Slice right away for the clearest fudge-and-ice-cream layers.