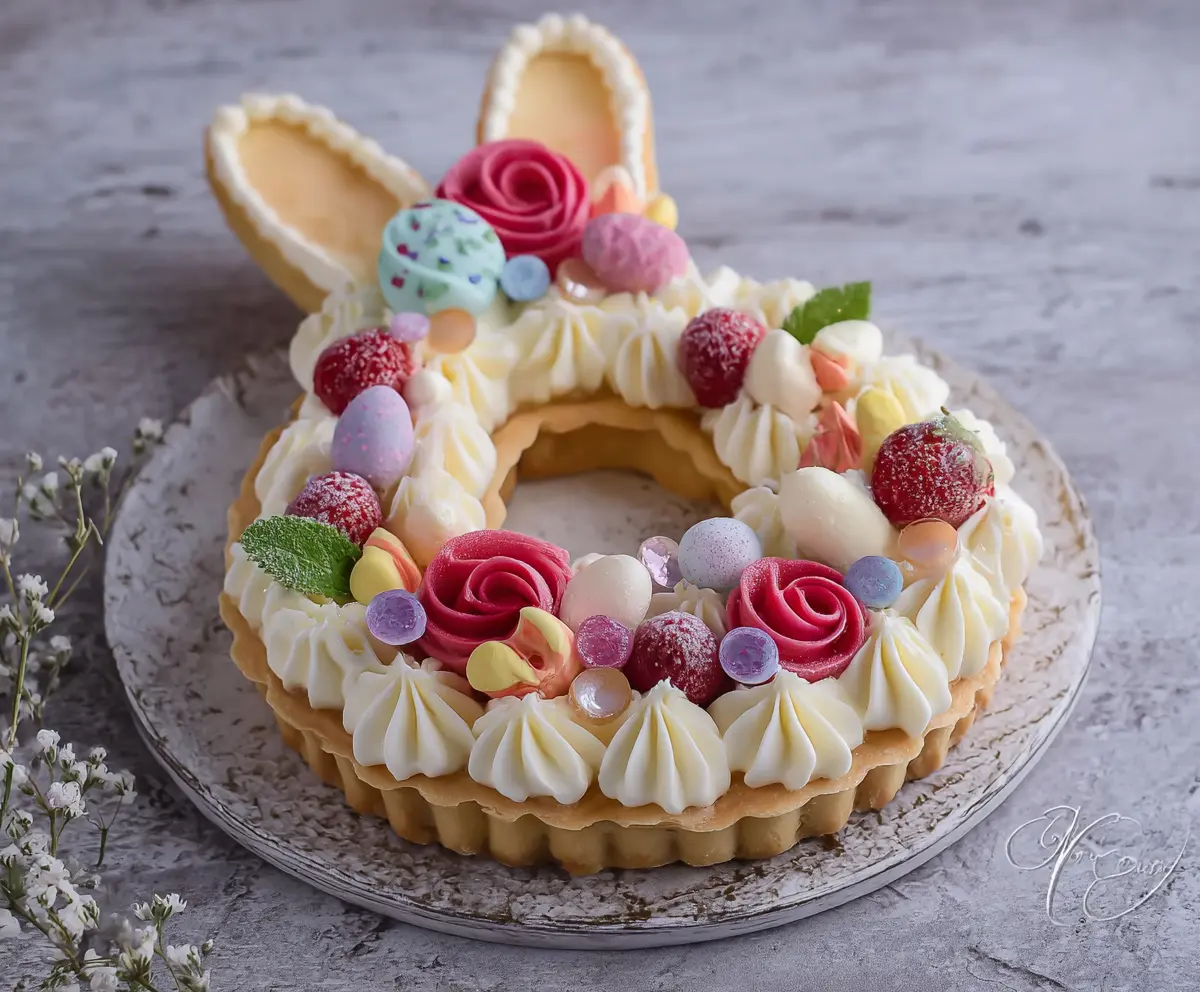
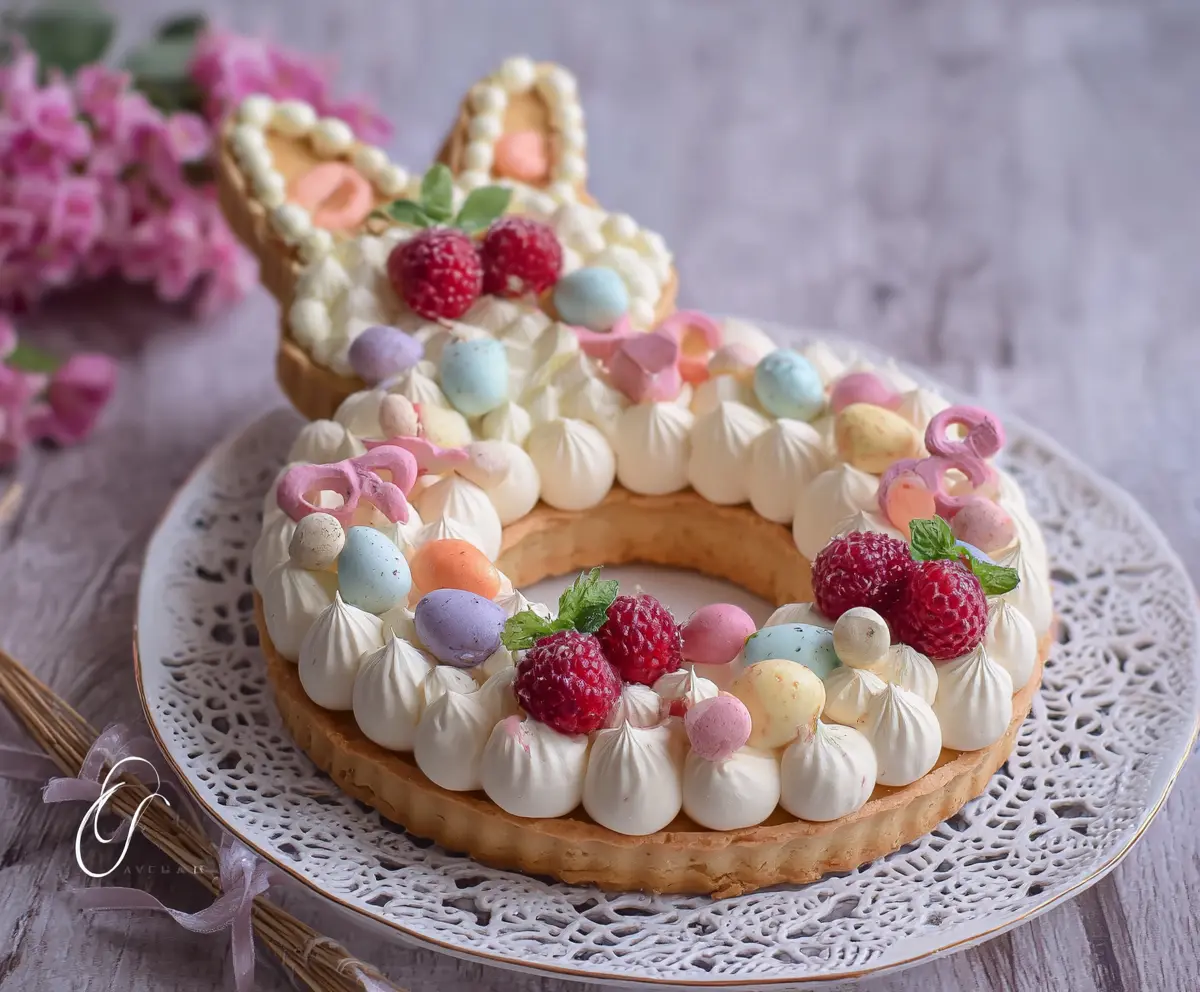
This Easter Bunny Cream Tart is a fun and festive treat! With a crispy crust and creamy filling, it’s perfect for celebrating the holiday with a sweet twist.
Honestly, who can resist a dessert shaped like a bunny? I love topping mine with fresh fruit and colorful sprinkles. It always puts a smile on everyone’s face! 🐰💖
Key Ingredients & Substitutions
All-Purpose Flour: This is the base for your tart crust. If you need a gluten-free version, try using a gluten-free all-purpose blend. My preference is to sift the flour for a fluffy texture.
Unsalted Butter: Cold butter gives the crust a nice, flaky texture. You can use margarine or vegan butter for a dairy-free option, though I find butter adds the best flavor.
Powdered Sugar: This makes the crust sweeter and finer. If you don’t have powdered sugar at hand, you can blend regular granulated sugar in a blender until fine. It’ll work just as well!
Cream Cheese: For the filling, soft cream cheese provides a rich taste. If you’re looking for a lighter option, mascarpone cheese works fantastic too. I love the creaminess it brings!
Heavy Cream: This ingredient whips well to add volume to your filling. If you prefer a lighter version, you can use whipping cream with a lower fat content, but the texture may be different.
How Do I Make the Perfect Tart Crust?
Making a great tart crust is all about the right technique! It’s key to keep the butter cold and not overwork the dough. Here’s how you can succeed:
- After mixing the flour and powdered sugar, quickly rub in the cold butter until you see coarse crumbs.
- Add the egg yolk and gradually mix in cold water to bring the dough together. It should not be sticky!
- Wrap it in plastic and chill for at least 30 minutes. This helps the gluten relax, making it easier to roll out.
How Can I Assemble My Tart with Style?
Assembling your tart can be a fun and creative step! Here’s how to make it visually appealing:
- Start by spreading the filling evenly in the tart ring, leaving some room for the decorations.
- Position the cut “ears” on top, ensuring they slightly overlap for that bunny look. A little cream piping on the edges ties everything together!
- Think playful with your decorations! Arrange strawberries, candy eggs, and flowers to enhance the bunny theme. A sprinkle of edible glitter is a nice finishing touch!
How to Make an Easter Bunny Cream Tart
Ingredients You’ll Need:
For the Tart Crust:
- 200g (1 2/3 cups) all-purpose flour
- 100g (7 tablespoons) unsalted butter, cold and cubed
- 50g (1/4 cup) powdered sugar
- 1 large egg yolk
- 1-2 tablespoons cold water (if needed)
For the Vanilla Cream Filling:
- 250ml (1 cup) heavy cream
- 250g (1 cup) cream cheese, softened
- 100g (1/2 cup) powdered sugar
- 1 teaspoon vanilla extract
Decorations:
- Fresh strawberries, halved or whole small sizes
- Mint leaves for garnish
- Edible sugar flowers or icing roses (pink/red)
- Small pastel-colored candy eggs (chocolate or sugar-coated)
- Mini macarons in pastel colors
- Edible glitter or dust for shimmer
- Sugar pearls or small sugar gems
- Powdered sugar for dusting
How Much Time Will You Need?
This delightful tart will take about 30 minutes to prepare, plus 15-20 minutes for baking. After assembling, you’ll need to chill it for at least 1 hour before serving, making the total time approximately 2 hours—perfect for a relaxed Easter celebration!
Step-by-Step Instructions:
1. Prepare the Tart Crust:
In a mixing bowl, combine the all-purpose flour and powdered sugar. Add the cold butter cubes and use your fingers to rub it into the flour until the mixture looks like coarse crumbs. Next, add the egg yolk and mix well, adding cold water a little at a time until the dough holds together. Shape the dough into a disk, wrap it in plastic wrap, and chill in the refrigerator for at least 30 minutes.
2. Shape and Bake the Tart Shell:
Preheat your oven to 180°C (350°F). On a lightly floured surface, roll out the chilled dough to about 5mm thick. Cut out a large ring shape, approximately 8 inches in diameter with a 3-inch hole in the center for the bunny’s face. Also, cut out two ear shapes from the remaining dough. Arrange the dough pieces on a baking sheet lined with parchment paper. Bake for 12-15 minutes or until golden brown. Once baked, remove from the oven and allow to cool completely.
3. Prepare the Vanilla Cream Filling:
In a large bowl, whip the heavy cream until stiff peaks begin to form. In a separate bowl, beat the softened cream cheese with powdered sugar and vanilla extract until the mixture is smooth. Carefully fold the whipped cream into the cream cheese mixture until combined, ensuring not to deflate the whipped cream.
4. Assemble the Tart:
Place the larger ring-shaped tart shell on a serving plate. Use a piping bag or a spoon to spread dollops of the vanilla cream filling evenly inside the ring. To create the bunny ears, place the two ear-shaped tarts at the top, slightly overlapping with the ring. Decorate the edges of the ears with some additional cream as border decoration.
5. Decorate:
Now comes the fun part! Arrange fresh strawberries, candy eggs, mini macarons, and edible flowers on top of the cream filling. Add mint leaves for a pop of color and freshness. Sprinkle powdered sugar and edible glitter for that festive feel! Also, place sugar pearls or edible gems around the cream dollops to add some extra sparkle.
6. Chill and Serve:
Once everything is assembled, refrigerate the tart for at least 1 hour to let the cream set properly. When ready to serve, slice, and enjoy your lovely, Easter Bunny-themed cream tart! It’s a wonderful treat to share with friends and family during your celebrations!
Can I Use a Store-Bought Tart Crust Instead?
Absolutely! If you’re short on time, a pre-made tart shell can save you effort. Just ensure it fits your baking dish and follow the instructions for filling and decorating as usual.
How Can I Make This Tart Gluten-Free?
You can substitute the all-purpose flour with a gluten-free flour blend. Look for one that is designed for baking to achieve a similar texture. The rest of the ingredients should remain the same!
What’s the Best Way to Store Leftovers?
Store any leftover tart in an airtight container in the refrigerator for up to 2 days. To ensure the decorations stay fresh, you might want to cover them lightly with foil. Just re-sprinkle some powdered sugar when ready to serve!
Can I Prepare This Tart in Advance?
Yes, you can prepare the tart crust and the cream filling a day ahead. Just store them separately in the fridge. Assemble and decorate the tart on the day of serving for the best look!